Expert DStv Installation Wizard Assistance in Cape Town and Western Cape
The DStv Installation Wizard is the built-in software assistant that guides you through every step of decoder setup—from satellite dish alignment to channel scanning and signal configuration. When the correct settings are selected, the wizard lets you move through setup quickly and easily, but incorrect selections or undetected hardware issues can cause it to fail, leaving you without channels and wasting valuable time. Knowing how the installation wizard works and when to call a professional technician is the difference between hours of frustration and a perfectly configured DStv system.
Common installation wizard errors—including E48-32 “No Signal,” missing channels, and wizard freezing—affect thousands of households across South Africa every month. These issues are especially prevalent in Cape Town, where coastal weather, strong south-easterly winds, and salt air accelerate equipment wear. At Sat Digital, our accredited DStv installers provide same-day installation wizard troubleshooting across Cape Town and the Western Cape, so you can get back to watching your favorite shows without delay.
Call 071 304 6955 for immediate DStv Installation Wizard assistance.
What Is the DStv Installation Wizard?
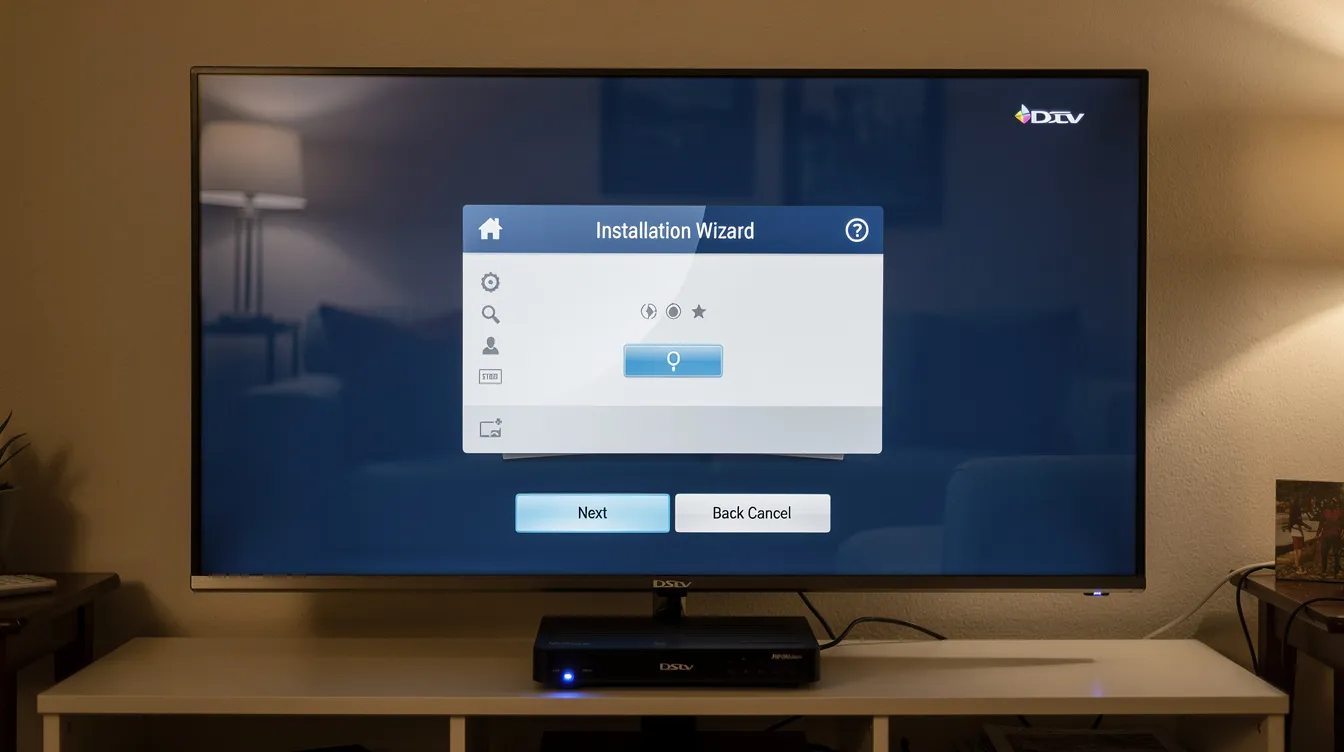
The DStv Installation Wizard is an automated setup assistant embedded in every DStv decoder, including HD, Explora, and Explora Ultra models. It is designed to walk you through the complete configuration process, ensuring your decoder communicates correctly with your satellite dish and delivers all available channels to your screen.
The DStv Installation Wizard starts automatically on first use, launching the moment you power up a brand-new decoder or after performing a factory reset. The wizard simplifies setup with clear on-screen instructions that guide users through language selection and channel scanning, satellite dish configuration, LNB type selection, and signal optimization.
Without completing the wizard correctly, your decoder often cannot download essential software, unlock its full functionality, or fetch your subscribed channels. It guides users through language selection and channel scanning, ensuring that every step—from selecting the correct satellite to verifying signal strength—is handled in the right order.
The benefits of running the DStv installation wizard properly include the following:
- Optimized Signal Quality: Correct settings ensure the strongest possible signal from your satellite dish.
- Full Channel Access: Proper configuration unlocks every channel included in your DStv subscription account.
- Streaming & Catch-Up: For Explora and Ultra models, the wizard enables internet-based features like Showmax and Netflix.
- Fewer Errors: Completing each step reduces the risk of recurring error messages and signal problems.
How the DStv Installation Wizard Works
Understanding the step-by-step process of the DStv installation wizard helps you identify where issues may occur and how to fix them quickly. Here is a complete breakdown of how the wizard works:
Step 1: Power Up and Launch The wizard auto-launches when you first power on your DStv decoder or after a factory reset. Manual launch of the Installation Wizard is possible through Settings—navigate to Menu → Settings → Satellite Settings → Home Network → Launch Installation Wizard.
Step 2: Language Selection Select your preferred language for on-screen menus and guides.
Step 3: Satellite Selection The wizard prompts you to select the correct satellite. IS-20 is used for specific Southern African countries, including South Africa, while E36B is selected for other African regions. Choosing the wrong satellite here is a common cause of signal problems.
Step 4: Setup Type Choose between quick or manual setup. Quick setup can often be used for standard installations with a Smart LNB, applying default settings automatically. Manual setup is necessary for configuring LNB type in HD decoders, giving you control over frequency bands and polarization—but increasing the risk of error if you’re unfamiliar with the settings.
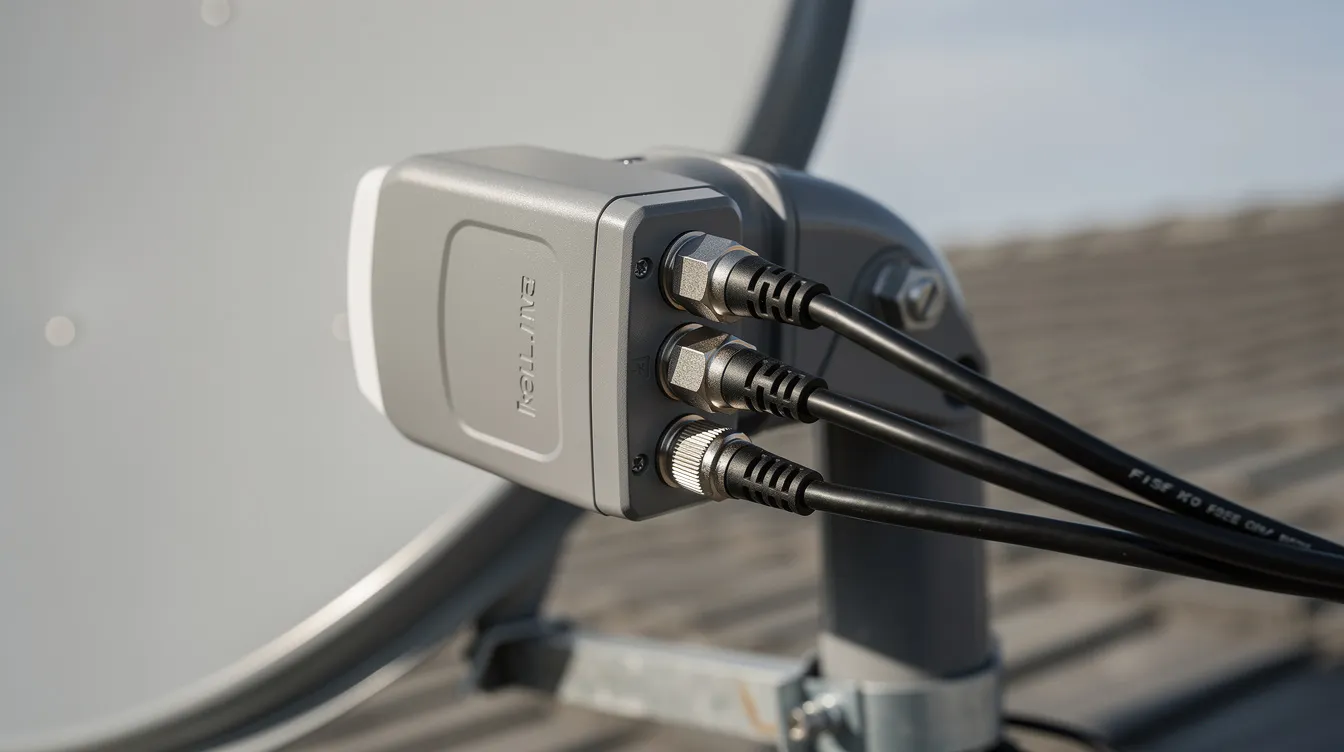
Step 5: LNB Type Configuration Select your LNB type: a universal LNB is standard for single-unit dwelling decoder setups, while smart LNB options include Unicable or SATCR for newer DStv models. For Smart LNB setups, the wizard prompts you to assign specific user band settings to avoid conflicts in multi-decoder or Extra View configurations.
Step 6: Channel Scanning Channel scanning is needed after configuring the decoder settings. The wizard scans for satellite signals and organizes your channels. Signal strength and quality indicators should be checked during setup—aim for at least 70% signal strength for clear channels.
Step 7: Network Connectivity For Explora and Ultra models, the wizard connects your decoder to your home internet via Ethernet or WiFi, enabling streaming, software updates, and catch-up features. A minimum speed of approximately 10 Mbps is recommended for HD content.
Understanding DStv Installation Wizard Decoder Settings
The installation wizard covers several categories of settings, each critical for a successful setup. Let’s break down every setting you need to know.
Home Network Settings
Configuring your internet connection within the installation wizard is essential for accessing DStv streaming services, downloading software updates, and using catch-up content. The wizard offers both wired (Ethernet) and wireless (WiFi connector) setup options.
If you experience network troubleshooting issues during wizard setup, check that your router is powered on, your WiFi password is entered correctly, and your internet speed meets the minimum requirement. Slow or unstable internet may cause the wizard to freeze at this step.
Satellite Settings
Satellite dish alignment parameters are configured through the wizard to ensure your decoder locks onto the correct satellite. The wizard helps configure decoder settings and satellite connection by prompting you to select the satellite (IS-20 for South Africa) and enter the correct dish alignment values.
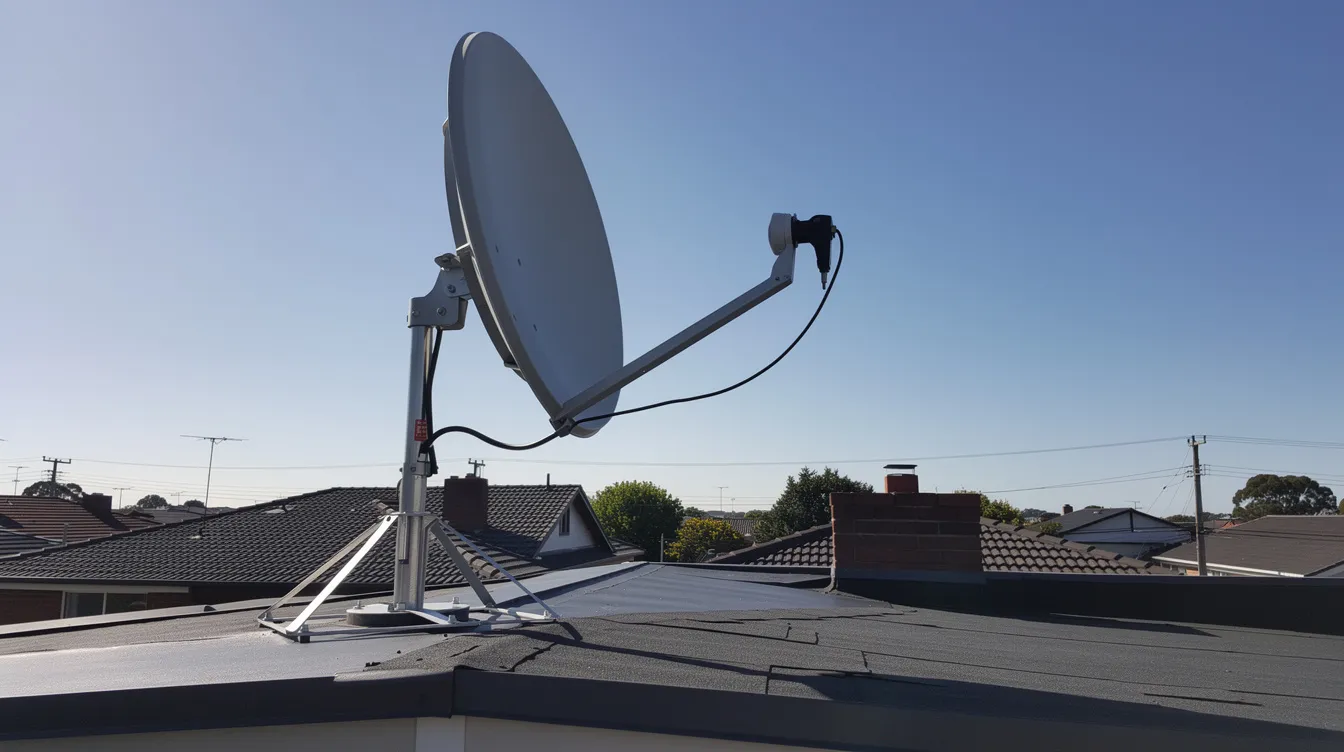
DStv installations often require physically aligning the satellite dish—adjusting azimuth, elevation, and skew angle. In Cape Town (approximately 33.9°S latitude), skew angles and elevation values are specific to the region. A well-aligned satellite dish is crucial for signal strength, and even minor dish misalignments can significantly affect reception quality.
Smart LNB Settings
Smart LNB detection and automatic configuration are handled within the wizard for Explora and Explora Ultra decoders. The wizard detects the Smart LNB type and assigns user bands automatically for each tuner.
For multi-switch setups—common in apartment complexes and communal dish arrangements throughout Cape Town—each decoder must be assigned a unique user band to avoid interference. Mistakes in user band assignment are one of the most frequent causes of decoder communication errors in multi-decoder installations.
Signal Configuration Settings
Users can access signal strength settings through the wizard to verify that the dish is correctly aligned. For optimal viewing:
- Signal Strength: Aim for 80–90% or higher. A signal strength of at least 70% is recommended for clear channels.
- Signal Quality: Target 70–80% minimum for HD content. If strength is high but quality is low, the issue is usually LNB skew, dish misalignment, or an obstruction.
Universal LNB settings typically use a low band frequency around 9,750 MHz and a high band around 10,600 MHz. Smart LNB and Unicable setups use specific user band frequencies for each tuner, which must be entered correctly in the wizard.
Weather compensation is particularly important for Cape Town’s climate conditions. Heavy winter rainfall causes “rain fade,” temporarily attenuating your signal and potentially triggering the E48-32 error. Proper dish alignment and an 80 cm satellite dish help compensate for signal loss during storms.
DStv Installation Wizard for Explora Decoders
The DStv Explora decoder offers enhanced installation wizard features compared to standard HD models. Here’s what makes the Explora wizard different:
- Multi-Tuner Signal Detection: The Explora decoder requires signal confirmation on all three tuners before the wizard proceeds. This ensures full functionality for recording, catch-up, and live viewing simultaneously.
- Recording Setup: The wizard configures PVR recording capabilities, allowing you to record one channel while watching another.
- Extra View Configuration: The Explora wizard includes steps to link primary and secondary decoders for Extra View setups, enabling you to watch DStv on multiple televisions throughout your home.
- Advanced Signal Detection: The Explora’s wizard runs a more thorough signal scan compared to HD models, detecting and locking onto all available transponders.
Troubleshooting Explora Installation Wizard Freezing Issues: If your Explora decoder gets stuck during the wizard, the most common causes are insufficient signal strength, a software download in progress, or smart card provisioning delays. Wait several minutes for the device to complete any background processes. If the wizard remains stuck, power cycle the decoder by unplugging it for 60 seconds and plugging it back in. If the problem persists, contact a professional technician.
DStv Installation Wizard for Explora Ultra
The DStv Explora Ultra takes the installation wizard a step further, optimized for 4K Ultra HD content and integrated streaming services.
Ultra-Specific Wizard Improvements:
- 4K Setup: The wizard detects HDMI 2.0 compatibility and configures output settings for 4K content, ensuring you get the best picture quality your TV supports.
- Streaming Service Integration: During setup, the wizard connects to Netflix, Showmax, and other streaming apps built into the Explora Ultra. This requires a stable internet connection, configured during the wizard’s network setup step.
- Enhanced Smart LNB Compatibility: The Explora Ultra requires a DStv Smart LNB—Universal LNBs are not supported. An 80 cm satellite dish is recommended for all Explora Ultra installations, as confirmed by DStv’s official specifications.
- Advanced Network Settings: The wizard includes more detailed network configuration for the Ultra, supporting both Ethernet and WiFi with enhanced troubleshooting options.
Decoder configurations may depend on the specific model being used, so always verify that your Explora Ultra is running the latest firmware before starting the wizard.
Common DStv Installation Wizard Errors
Understanding the most common errors that occur during the DStv installation wizard setup helps you troubleshoot quickly or know when it’s time to call a professional.
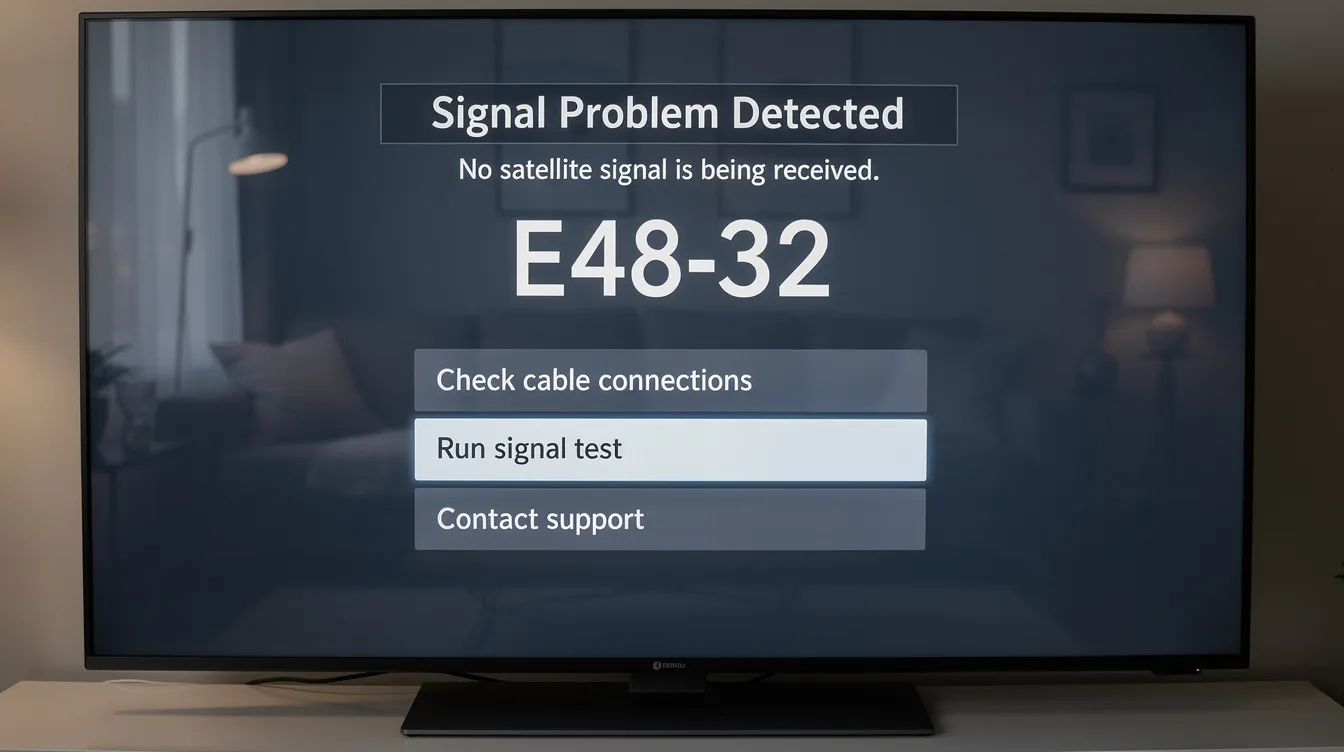
No Signal Error The decoder cannot detect any satellite signal. Causes include loose cables, dish misalignment, LNB failure, and heavy rain. This is the most frequently reported installation wizard error across South Africa.
Signal Not Found During Scanning The wizard scans but cannot lock onto the satellite. This typically indicates that the satellite dish is not properly aligned or the wrong satellite has been selected in the wizard settings.
Missing Channels After Wizard Completion You’ve completed the wizard, but some or all channels are missing. This may be caused by incorrect frequency band settings, an incomplete scan, or subscription activation delays on your DStv account.
Decoder Communication Errors with Smart LNB Wrong user band settings, incorrectly wired ports, or conflicts in communal dish setups cause the decoder to fail communication with the Smart LNB. This is particularly common in Cape Town apartment complexes using shared satellite dishes.
Installation Wizard Freezing at Specific Steps The wizard may freeze during software downloads, channel scanning, or signal detection. Software glitches, internet connectivity issues, or very low signal can cause this. Restarting the decoder often resolves temporary freezes.
E48-32 Error Code Error E48-32 indicates a signal problem during setup. According to DStv’s official error code guide, this error message appears when the decoder loses its satellite signal. Causes range from cable faults and LNB damage to weather interference and incorrect settings.
How to Fix DStv Installation Wizard Problems
When your installation wizard encounters issues, follow these troubleshooting steps before calling for professional help:
Power Cycling the Decoder: Power cycling the decoder can resolve minor glitches. Unplug the decoder from the wall for 60 seconds, then plug it back in. This clears temporary software errors and forces the wizard to restart fresh.
Factory Reset Procedures A factory reset may be necessary if power cycling fails. Navigate to Menu → Settings → System → Factory Reset. Then press OK on the remote or confirm on the decoder to start the reset. Note that this erases all custom settings and recorded content—only use this as a last resort.
Manual Signal Scanning When the automatic wizard fails, try running a manual scan. Select Manual setup in the wizard and enter the correct satellite, LNB type, and frequency settings for your installation. This gives you more control over the scanning process.
Cable Connection Checks Coaxial cables must be securely connected to the decoder’s LNB port. Inspect all F-connectors for corrosion, loose fittings, or water damage. In Cape Town, salt air and coastal weather accelerate cable corrosion. Inspect cables regularly to prevent signal loss.
LNB Testing Check your LNB for visible cracks, water ingress, or physical damage. If the LNB is old or faulty, no amount of wizard configuration will fix signal issues.
When to Contact a Professional Technician If you’ve tried all the steps above and the wizard still cannot find a signal or complete setup, the issue likely requires professional diagnostic equipment. Complex problems—such as Smart LNB user band conflicts, communal dish wiring faults, or dish realignment—need an accredited DStv technician. Contact Sat Digital at 071 304 6955 for same-day assistance.
Why the DStv Installation Wizard Cannot Find a Satellite Dish Signal
When the wizard reports “No Signal” or cannot detect the satellite, there are five primary causes:
Satellite Dish Misalignment Improper satellite dish alignment can cause signal issues. Even a shift of one or two degrees—caused by strong winds, building vibrations, or settling brackets—can drop your signal below usable levels. Use a signal meter to fine-tune dish alignment, making small adjustments to azimuth, elevation, and skew.
Faulty LNB Components The LNB (Low Noise Block) receives the satellite signal and passes it to your decoder. Cracked housings, water damage, or age-related degradation cause the LNB to fail. A damaged LNB produces high signal strength but zero signal quality—a telltale diagnostic sign.
Damaged Coaxial Cables: RG6 coaxial cables degrade over time, especially when exposed to weather. Water ingress at joints, corroded connectors, and physical damage all disrupt signal flow. In Cape Town, coastal conditions mean cables need more frequent inspection and replacement than inland areas.
Weather Damage: Cape Town’s strong south-easterly winds can physically shift dish alignment, while intense winter rainfall causes temporary rain fade. If your signal fails during light rain, your baseline signal quality is likely marginal—a larger dish or professional realignment may be required.
Incorrect Wizard Settings Selecting the wrong satellite, LNB type, or frequency settings prevents the wizard from locking onto the signal. Ensure IS-20 is selected for South Africa and that your LNB type matches the actual hardware installed on your dish. Check for obstructions like trees or buildings affecting alignment as well.
DStv Signal Troubleshooting Guide
Systematic signal troubleshooting resolves most DStv installation wizard issues. Follow this guide to diagnose and fix signal problems:
Signal Strength Measurement and Optimisation Access the signal test through your decoder’s settings menu. A signal strength of at least 70% is recommended for clear channels, with 80–90% being ideal. Signal quality should be 70–80% or higher for HD content. If strength is acceptable but quality is poor, the issue is typically LNB skew or dish alignment.
Dish Alignment Procedures Proper satellite dish alignment is crucial for signal strength. Signal alignment is critical for successful satellite connection. Adjust the dish in small increments—azimuth first, then elevation, then LNB skew. Use a signal meter to fine-tune dish alignment for the most accurate results. In Cape Town, elevation and skew values are specific to the 33.9°S latitude.
LNB Testing and Replacement Test the LNB by checking signal strength and quality readings. If strength is high but quality is zero or very low, the LNB likely needs replacement. Also check that the LNB skew is correct for your location—incorrect skew causes polarization mismatches.
Cable Integrity Checks Walk the entire cable run from dish to decoder. Look for kinks, cuts, exposed shielding, and corroded connectors. Replace any damaged sections with quality RG6 coaxial cable and properly shielded F-connectors. Weatherproof all outdoor connections.
Environmental Factors in the Western Cape: Cape Town’s unique conditions create specific challenges:
- Salt air corrosion accelerates degradation of brackets, connectors, and cables. Use stainless steel hardware and sealed connectors.
- Southeasterly winds shift dish alignment regularly. Ensure your dish is mounted on brick or concrete with robust brackets.
- Winter rainfall causes frequent E48-32 complaints during storms. An 80 cm dish provides better rain-fade resilience than older 60 cm installations.
DStv Installation Wizard and Smart LNB Configuration
Smart LNB technology is central to modern DStv installations, and the installation wizard handles most of the configuration automatically.
Smart LNB Automatic Detection During the wizard, the decoder detects the Smart LNB and configures user bands for each tuner. This process is seamless in most single-decoder installations. Smart LNB options include Unicable or SATCR for newer DStv models, reducing the number of coaxial cable runs required.
Configuring Multiple Decoder Connections In households with multiple decoders—such as an Explora primary and HD secondary—each decoder must be assigned a unique user band through the wizard. Duplicate user bands cause signal conflicts, where one decoder may “steal” the signal from another.
Smart LNB Troubleshooting If the wizard fails to detect the Smart LNB, check all cable connections, verify that the correct LNB type is selected in the wizard, and ensure the Smart LNB is receiving power from the decoder. In communal dish setups across Cape Town—common in apartment complexes in areas like Bellville and Sea Point—professional handling is often required to correctly assign user bands across multiple units.
Upgrading from Standard to Smart LNB If you’re upgrading from a Universal LNB to a Smart LNB system, the installation wizard must be run again from the beginning. Select the correct LNB type during setup, and ensure all cabling meets the required standards for Smart LNB compatibility.
DStv Installation Wizard and Extra View Setup
Extra View allows you to watch DStv on multiple televisions using linked decoders, and the installation wizard plays a central role in configuration.
Extra View Decoder Configuration The wizard on each decoder includes an Extra View setup option. The primary decoder is configured first, followed by the secondary decoder. Both devices must be linked through the wizard to share the same DStv subscription account.
Primary and Secondary Decoder Linking During the wizard, the secondary decoder detects the primary decoder through the satellite connection. Both decoders must be on the same Smart LNB system with correctly assigned, non-conflicting user bands.
Extra View Signal Distribution Proper signal distribution is essential. Each decoder’s tuner needs sufficient signal strength—aim for at least 70% signal strength for clear channels on both the primary and secondary device. Any signal weakness on one decoder affects the entire Extra View setup.
Troubleshooting Extra View Connection Issues Common problems include incorrect user band assignment, faulty cabling between the Smart LNB and decoders, and incomplete wizard completion on either device. If your Extra View setup shows an error message or channels are missing on the secondary decoder, re-run the installation wizard on both units and verify all settings match.
DStv Installation Wizard for New Decoder Installations
Setting up a brand-new DStv decoder requires careful coordination between hardware installation and wizard configuration.
First-Time Decoder Setup The DStv Installation Wizard starts automatically on first use of any new decoder. The wizard helps configure decoder settings and satellite connection from scratch, guiding you through every required step.
New Installation Requirements Before running the wizard, ensure the following are in place:
- An 80 cm satellite dish, correctly mounted and aligned for Cape Town’s coordinates
- The correct LNB type installed (Universal for single decoders, Smart LNB for Explora/Ultra)
- RG6 coaxial cable runs from dish to decoder, with all connectors properly secured
- Active DStv subscription and smart card inserted in the decoder
- Internet connection available (for Explora and Ultra models)
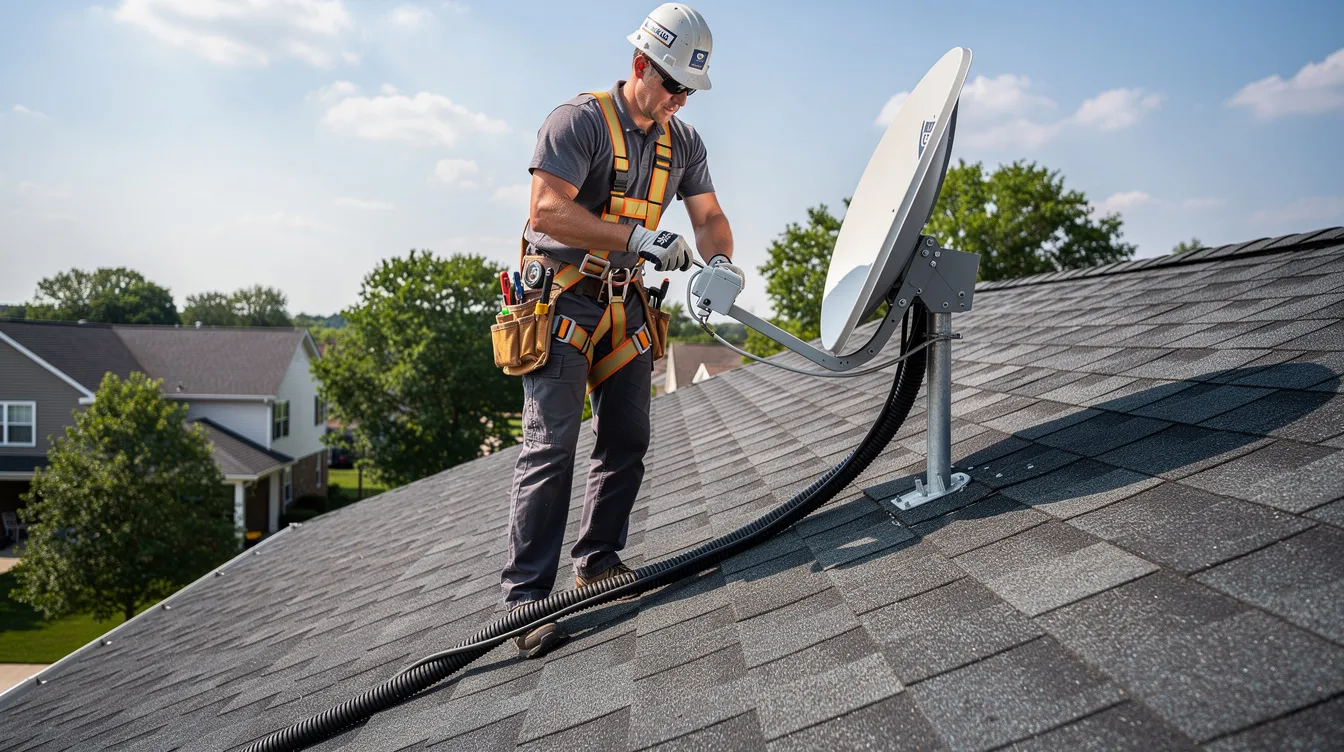
Professional Installation vs. DIY: A DIY wizard setup may work for straightforward single-decoder installations. However, for Explora, Explora Ultra, Extra View, or any multi-decoder setup, professional installation is strongly recommended. Accredited installers bring signal meters, torque tools, weatherproofing materials, and the expertise to avoid the common mistakes that lead to recurring issues.
According to DStv’s accredited installation standards, professional installations include equipment installation, activation, a tutorial on decoder functionality, a 12-month equipment warranty, and a 3-month workmanship warranty.
DStv Installation Wizard After a Factory Reset
A factory reset returns your decoder to its original state, erasing all custom settings, recordings, and configurations. Understanding what happens next is essential.
When a Factory Reset Is Necessary A factory reset may be necessary if power cycling fails to resolve persistent wizard errors, software corruption, or decoder malfunctions. It’s also required after certain firmware updates or when transferring a decoder to a new installation.
Post-Reset Wizard Configuration After a factory reset, the installation wizard launches automatically. You’ll need to reconfigure all settings from scratch—language, satellite selection, LNB type, channel scanning, and network connectivity. There is no way to skip or bypass the wizard after a reset.
Backup and Reinstalling Custom Configurations Unfortunately, DStv decoders do not offer a settings backup feature. After a factory reset, you’ll need to manually re-enter all custom settings, re-link Extra View decoders, and re-scan channels. Make a note of your current settings—especially LNB type, user bands, and network details—before performing a reset.
Common Issues After Factory Reset
- Wizard stuck on signal scanning: check dish alignment and cable connections
- Missing channels after scan: verify satellite selection (IS-20 for South Africa) and subscription activation
- Network connection failure: re-enter WiFi credentials or check Ethernet cable
- Smart card not recognised: remove, clean, and reinsert the smart card; wait a moment for the decoder to read it
Why Professional DStv Assistance Matters
While the installation wizard is designed to simplify setup, many situations require the expertise of a qualified DStv technician.
Complex Installation Wizard Issues Some wizard errors—such as Smart LNB user band conflicts, communal dish wiring faults, or persistent E48-32 errors—cannot be resolved through basic troubleshooting. Professional technicians have the training and experience to diagnose these issues quickly.
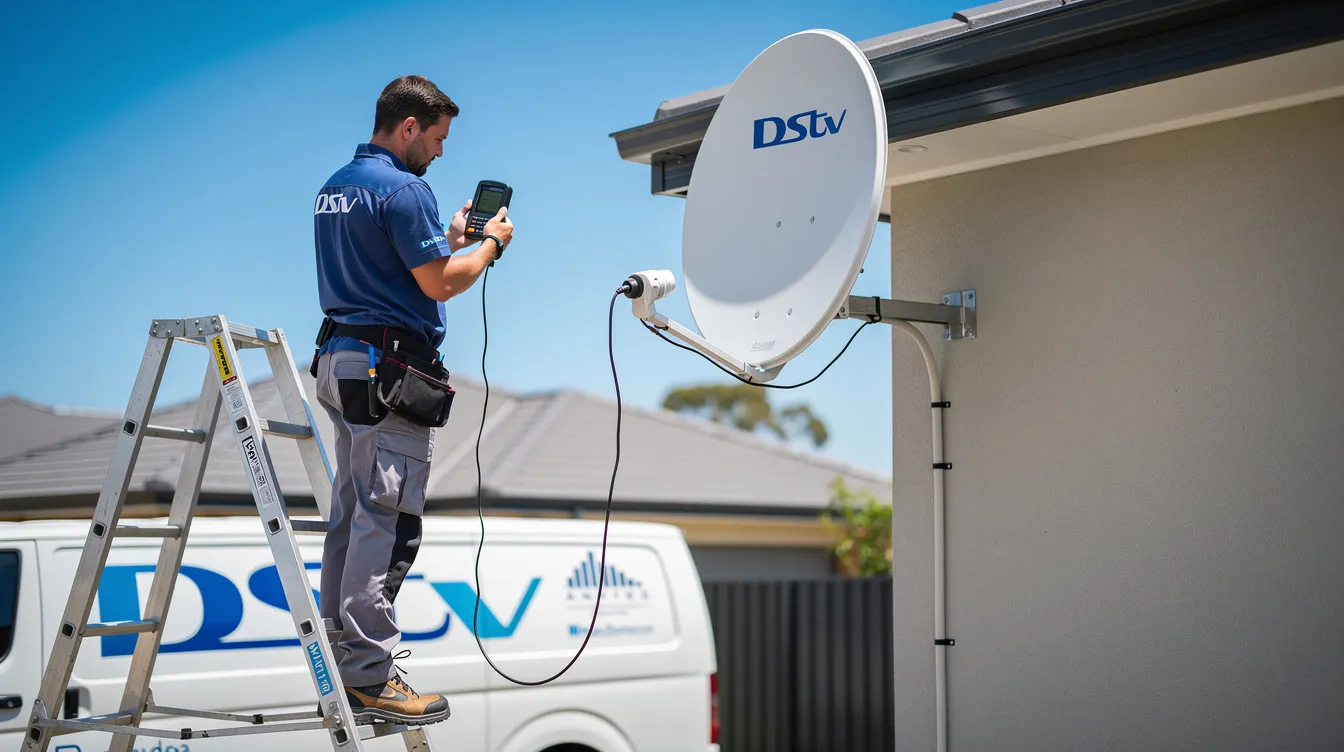
Signal Optimisation Beyond the Wizard The wizard shows signal strength and quality percentages, but a professional installer uses dedicated signal meters to fine-tune dish alignment down to fractions of a degree. Minor misalignments can significantly affect reception quality, and professional equipment detects issues invisible to the on-screen display.
Professional Equipment and Tools Accredited installers arrive with signal meters, torque wrenches, weatherproofing compounds, quality RG6 cabling, and replacement LNBs. This equipment ensures every component of your installation meets the standard required for reliable long-term performance.
Warranty Protection: DStv-accredited installations include a 12-month equipment warranty and a 3-month workmanship warranty. DIY installations carry no warranty coverage, meaning any mistakes or hardware failures come entirely out of your pocket.
Time and Money Savings A professional installation gets it right the first time. DIY attempts that result in repeated errors, incorrect settings, or damaged equipment ultimately cost more in time and money than hiring an accredited technician from the start.
Same-Day DStv Signal Troubleshooting
When your DStv installation wizard fails or your signal drops unexpectedly, waiting days for a fix is not an option.
Sat Digital provides same-day DStv signal troubleshooting across Cape Town and the Western Cape. Our response process works like this:
- Call 071 304 6955 and describe your issue—whether it’s a wizard error, signal problem, or complete signal loss.
- Rapid Diagnosis: Our technician assesses whether the issue can be resolved remotely or requires an on-site visit.
- Same-Day Visit: For on-site issues, we dispatch an accredited technician with professional diagnostic equipment to your location.
- Complete Resolution: We identify and fix the root cause—not just the symptom—so the problem doesn’t return.
Whether you’re dealing with an E48-32 error after a storm, a wizard that’s stuck on scanning, or channels missing after a factory reset, our team resolves the issue efficiently and professionally.
Why Choose Sat Digital for DStv Installation Wizard Support?
Sat Digital is the trusted choice for DStv installation wizard assistance across Cape Town and the Western Cape. Here’s why homeowners and businesses choose us:
- DStv Accredited Installers: Our technicians are fully accredited with installation wizard expertise across all decoder models, including HD, Explora, and Explora Ultra.
- Same-Day Service: We understand that a broken DStv setup disrupts your daily routine. That’s why we offer same-day service across Cape Town and surrounding areas.
- Professional Signal Testing Equipment: We use dedicated signal meters and professional-grade tools for accurate dish alignment, LNB testing, and cable diagnostics, delivering results that DIY approaches simply cannot match.
- Comprehensive Warranty: All our installation wizard configuration work is backed by a solid warranty, giving you peace of mind and protecting your investment.
- Transparent Pricing: We provide clear, upfront quotes with no hidden fees for wizard troubleshooting, decoder setup, or signal optimization.
- Customer Satisfaction Guarantee: We don’t leave until your DStv is working perfectly. Every installation wizard configuration is tested and verified before we complete the job.
Contact Sat Digital today: 📞 Phone: 071 304 6955 📧 Email: info@satdigital.co.za 🌐 Website: www.satdigital.co.za
Frequently Asked Questions
What is the DStv Installation Wizard, and how does it work?
The DStv Installation Wizard is an automated setup assistant built into every DStv decoder. It launches automatically when you first power on a new decoder or after a factory reset. The wizard guides you through satellite selection, LNB configuration, channel scanning, and network setup to ensure your decoder is properly configured and ready to watch.
Why is my installation wizard stuck and not progressing?
A stuck installation wizard is usually caused by low signal strength, a software download in progress, or smart card issues. Ensure your satellite dish is properly aligned and cables are securely connected. Try restarting the decoder by unplugging it for 60 seconds. If the wizard remains stuck, professional assistance may be required—call Sat Digital at 071 304 6955.
What settings should I use during the installation wizard setup?
For South Africa, select the IS-20 satellite. Choose the LNB type that matches your hardware: a universal LNB for standard single-decoder setups or a smart LNB for Explora and Explora Ultra installations. Quick setup works for most standard installations with a smart LNB, while manual setup is necessary for configuring LNB type in HD decoders.
Does the installation wizard work on Explora Ultra decoders?
Yes. The DStv Explora Ultra has an enhanced installation wizard that includes 4K setup, streaming service integration (Netflix and Showmax), and advanced Smart LNB configuration. The Explora Ultra requires a Smart LNB and an 80 cm satellite dish for optimal performance.
Can a faulty LNB cause installation wizard problems?
Absolutely. A faulty, cracked, or water-damaged LNB prevents the wizard from detecting satellite signals. If your signal strength reads high but quality is very low or zero, the LNB likely needs replacement. This is one of the most common causes of “No Signal” errors during wizard setup.
Why are channels missing after completing the installation wizard?
Missing channels typically result from incorrect frequency settings, an incomplete channel scan, or delays in subscription activation on your DStv account. Try running the wizard again with the correct satellite and LNB settings. If channels are still missing, contact DStv to verify your subscription status or call Sat Digital for professional troubleshooting.
Why is my signal strength low during wizard scanning?
Low signal strength during scanning is usually caused by dish misalignment, a damaged LNB, faulty cables, or obstructions in the satellite line of sight. Aim for at least 70% signal strength for clear channels. Check for obstructions like trees or buildings affecting alignment, and ensure all cable connections are secure.
Can Sat Digital assist with decoder setup and wizard issues?
Yes. Sat Digital provides complete decoder setup and installation wizard support for all DStv models across Cape Town and the Western Cape. Whether you need a new installation, wizard troubleshooting, or signal optimization, our accredited technicians are available for same-day service. Call 071 304 6955 or email info@satdigital.co.za.
What happens to wizard settings after a factory reset?
A factory reset erases all decoder settings, recordings, and custom configurations. The installation wizard launches automatically after the reset, and you must reconfigure everything from scratch—satellite selection, LNB type, channel scanning, and network settings. Make a note of your current settings before performing a reset.
Can you help with Extra View setup through the installation wizard?
Yes. Sat Digital specializes in Extra View installations, including proper Smart LNB user band configuration, primary and secondary decoder linking, and signal distribution to multiple viewing points. Extra View setup through the installation wizard requires precise settings to avoid conflicts between decoders.
Do you provide same-day installation wizard support?
Yes. Sat Digital offers same-day DStv installation wizard support across Cape Town and the Western Cape. Call 071 304 6955, describe your issue, and we’ll dispatch an accredited technician with professional equipment to resolve the problem quickly.
How much does professional installation wizard assistance cost?
Sat Digital provides transparent pricing with no hidden fees. The cost depends on the specific issue—simple wizard troubleshooting costs less than a complete new installation with dish alignment. Call 071 304 6955 for a clear, upfront quote before we begin any work.
What areas do you cover for DStv installation wizard services?
Sat Digital covers all areas across Cape Town and the broader Western Cape region, including suburbs like Constantia, Bellville, Sea Point, Durbanville, Table View, and beyond. No matter where you are in the Western Cape, we can provide same-day assistance.
Can weather affect the installation wizard signal detection?
Yes. Heavy rain causes “rain fade,” temporarily reducing signal strength and potentially triggering E48-32 errors during wizard scanning. Cape Town’s intense winter rainfall and strong winds are common causes of signal disruption. If your signal fails during light rain, your baseline signal quality is likely marginal, and a professional realignment or larger dish may be added to improve resilience.
Is professional installation wizard setup covered by the warranty?
Yes. DStv-accredited installations, including those performed by Sat Digital, include a 12-month equipment warranty and a 3-month workmanship warranty as mandated by MultiChoice. This protects you against equipment faults and installation errors—something DIY setup does not provide.
Contact Us Today for DStv Installation Wizard Assistance
Don’t let installation wizard errors, signal problems, or incorrect settings keep you from enjoying your DStv. Whether you need help with a new decoder setup, Explora Ultra configuration, Extra View linking, or urgent signal troubleshooting, Sat Digital’s accredited technicians are ready to help today.
Our team delivers expert DStv installation wizard support with transparent pricing, professional equipment, and guaranteed results across Cape Town and the entire Western Cape.
Get started now:
📞 Phone: 071 304 6955 📧 Email: info@satdigital.co.za 🌐 Website: www.satdigital.co.za
Call 071 304 6955 right now for immediate, same-day DStv Installation Wizard assistance.