How to Set Up DStv signal
Learn how to set up your DStv signal step-by-step with this complete guide. Discover the correct signal settings, fix common problems like E48-32 no signal errors, and improve your viewing quality for a clear and stable connection at home.
Introduction to DStv
DStv is one of South Africa’s leading satellite television services, offering a diverse selection of channels and entertainment for homes and businesses. DStv works by transmitting a satellite signal from the broadcaster to your satellite dish, and proper dish alignment is crucial for receiving this signal clearly. To enjoy uninterrupted access to your favourite channels, it’s essential to have a stable DStv signal. The DStv signal is delivered via a satellite dish, which must be properly aligned and installed to achieve the best possible signal strength and quality. If your satellite dish isn’t correctly positioned, you may experience satellite signal issues such as pixelation, loss of channels, or complete signal loss. Heavy rain and storms can also cause temporary signal loss, a phenomenon known as rain fade. This comprehensive guide will walk you through the essential steps for setting up your DStv system, troubleshooting common DStv signal issues, and maintaining a strong, reliable signal for optimal viewing.
Pre-Installation Checks
Before you begin your DStv installation, taking a few moments for pre-installation checks can make all the difference in achieving optimal signal reception and avoiding common DStv signal issues down the line. Start by carefully selecting the location for your DStv satellite dish. The ideal spot should offer a clear line of sight to the satellite, free from obstructions like trees, buildings, or other structures that could cause signal interference or block your DStv signal. Positioning your dish away from areas prone to harsh weather conditions, such as strong winds or heavy rain, can also help maintain consistent signal quality and reduce the risk of temporary signal loss.
Next, ensure that your DStv decoder, satellite dish, and LNB (Low Noise Block) are all compatible and in good working order. Double-check that your decoder supports the specific satellite settings required for your region and that your LNB is suitable for your chosen dish. Proper compatibility between these components is essential for strong signal reception and minimizing signal issues during setup.
By performing these pre-installation checks, you lay the groundwork for a smooth DStv setup process, helping to prevent signal problems and ensuring your system delivers reliable entertainment from the start.
Step 1: Gather the Necessary Equipment
Before starting, ensure you have the following:
-
A DStv decoder
-
A DStv dish (with LNB)
-
An RG6 coaxial cable (using RG6 coaxial cable is recommended for best signal transmission)
-
A smartcard (provided by DStv)
-
A television
A professional DStv installation kit includes all essential components for a successful setup. Using the right tools for installation and troubleshooting is crucial to ensure proper alignment, optimal signal quality, and efficient problem-solving. Using high-quality coaxial cables can help improve signal strength and reduce signal loss. Essential tools for DStv installation include a satellite finder, wrenches, and coaxial cables.
Choosing the right components for your DStv setup determines your viewing experience and future expansion capabilities.
If you’re missing any of these, you can find them at SatDigital’s DStv installation services.
Step 2: Position the Satellite Dish Correctly
Finding the Right Angle
Your satellite dish must be correctly aligned to receive a strong signal. In South Africa, the DStv satellite is positioned at 68.5° East. The best way to align your dish is to:
-
Use a compass or a satellite alignment app. Set the azimuth angle to 68.5° East using the compass for accurate horizontal alignment.
-
Mount the dish on a stable surface, preferably facing north-east.
-
Adjust the elevation (tilt) to around 36–40 degrees, depending on your location. This initial elevation angle setting is standard for South Africa.
Make sure to set the LNB skew by tilting the connector toward the 4 o’clock position for optimal signal. Using a satellite finder can help you achieve precise dish alignment and optimal signal performance. Adjusting both the elevation and azimuth angles is necessary for the best possible signal strength.
For a hassle-free installation, consider hiring a professional DStv installer to align your dish accurately. If you are unsure of how set up your DStv signal, professionals can help.
Step 3: Check for Damaged Cables
When you’re experiencing DStv signal problems, one of the first things to inspect is your cabling. Damaged or loose cables can lead to signal loss, interference, and poor signal quality, making it difficult to enjoy your favourite channels. Start by carefully examining the coaxial cable that runs from your satellite dish to your DStv decoder. Look for any visible signs of damage, such as cuts, cracks, fraying, or corrosion. Pay special attention to the F-connectors at both ends of the cable—these should be securely attached and free from rust or looseness. If you discover any damaged cables or faulty connectors, replace them immediately to restore optimal signal transmission. Ensuring all cables are properly connected and in good condition is a simple yet crucial step in maintaining a strong DStv signal.
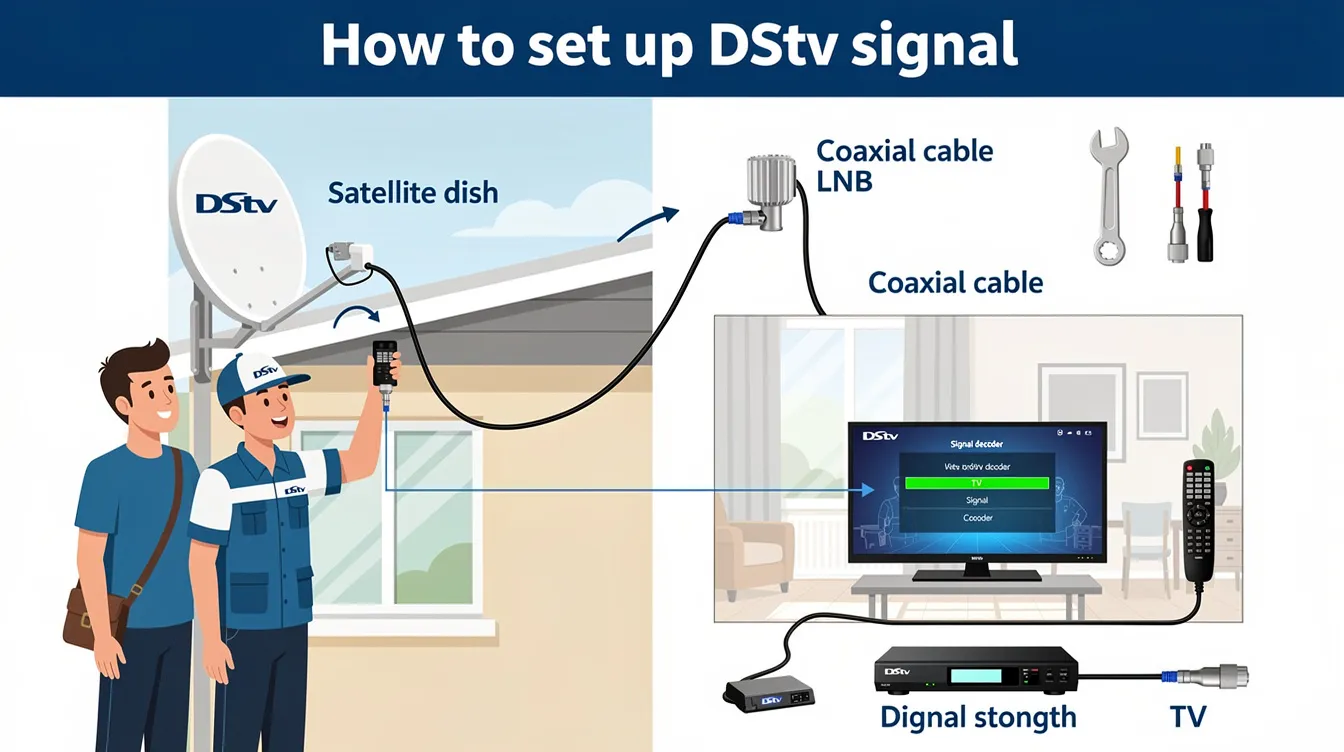
Step 3: Connect the Cables
Before starting, check cables for any loose cable connections or loose or damaged cables. Secure all connections to prevent signal loss.
Once your dish is properly aligned:
-
Connect the coaxial cable from the LNB (Low Noise Block) on the dish to the “LNB IN” port on the back of your decoder. Check all cable connections between the satellite dish and the decoder to ensure they are secure and undamaged.
-
Plug in the power cable and connect the decoder to your TV using an HDMI or RCA cable. Ensure the decoder is connected to a stable power source for reliable operation.
-
Insert your DStv smartcard into the decoder if it’s not already inserted.
Using high-quality coaxial cables can help boost DStv signal strength significantly.
Step 5: Set Up Your Decoder
Properly setting up your DStv decoder is key to achieving optimal signal reception and enjoying a seamless viewing experience. Begin by connecting the coaxial cable from your satellite dish directly to the decoder. Once everything is connected, power on both your decoder and TV. Using your DStv remote, access the decoder menu and navigate to the satellite settings section. Here, select the correct satellite and adjust the LNB settings as required for your installation. After saving your changes, exit the menu and use the built-in signal meter to check both signal strength and quality. This tool helps you fine-tune your setup for the best possible signal reception. By following these steps, you’ll ensure your decoder is configured correctly, allowing you to enjoy clear, uninterrupted DStv channels.
Step 4: Scan for Channels
Now that your decoder is connected:
-
Turn on your TV and decoder.
-
Press the “DStv” button on your remote to access the DStv menu.
-
Navigate to Settings > Satellite Settings > Home Network in the DStv menu.
-
Select “Start Installation” and wait for the decoder to scan for channels. This is a crucial step in the DStv setup process and ensures optimal signal performance for your viewing experience.
If the scan is unsuccessful, use the DStv menu to check your DStv signal strength by pressing:
-
Menu > General Information > Signal Status
Checking the signal strength on the decoder can help diagnose signal issues. Monitor the DStv signal strength on your decoder and ensure it is above 75% for optimal viewing. The signal quality should ideally be above 70% for the best performance during setup. For signal strength monitoring during setup, you can also use a satellite finder meter connected to the coaxial cable near the dish.
If your signal strength is lower, adjust your dish alignment slightly. Proper DStv setup and alignment will help ensure signal returns to optimal levels and maintain reliable signal performance. Knowing how to set up your DStv signal can significantly improve your viewing experience.
Step 5: Activate Your DStv Subscription
To complete the setup, you need to activate your subscription:
-
Visit the DStv self-service portal (selfservice.dstv.com).
-
Log in and enter your smartcard number.
-
Follow the on-screen instructions to activate your package.
If you encounter activation issues, contact DStv support for assistance.
Understanding DStv Signal Issues
DStv signal issues can disrupt your viewing experience, but knowing the common causes can help you quickly identify and fix the problem. One of the most frequent culprits is poor satellite dish alignment—if your dish isn’t pointed in the right direction, your signal strength will suffer. Damaged or loose cables, incorrect LNB settings, and faulty F-connectors can also lead to signal loss or interference. Environmental factors like heavy rain, bad weather, or nearby buildings and trees blocking the dish can further impact your signal quality. To prevent these issues, regularly check your satellite dish alignment, inspect all cables and connections, and ensure your LNB settings are correct. Performing routine maintenance, such as cleaning your dish and tightening any loose connections, can go a long way in maintaining strong signal levels. By understanding and addressing these common DStv signal issues, you’ll keep your channels clear and your viewing uninterrupted.
Troubleshooting Common Signal Issues

DStv signal problems can often be resolved by checking satellite signal strength and quality, realigning the dish, and involving a technician if necessary. Troubleshooting your DStv signal involves identifying the cause of the issue, performing basic checks, and ensuring your satellite signal is strong and stable.
To fix DStv signal and fix signal issues, follow these troubleshooting steps to resolve common DStv signal problems and improve your viewing experience:
-
Common causes of DStv signal loss include misaligned satellite dishes, damaged cables, and faulty LNBs.
-
The E48-32 error typically indicates a signal problem with the DStv decoder.
-
Check all cable connections and ensure they are securely plugged in to avoid signal interference and signal loss.
-
Rebooting the DStv decoder can resolve minor software glitches and signal issues.
-
Trim any trees or obstacles that may be blocking the dish’s line of sight to the satellite, as obstructions can cause you to lose signal.
-
Inspect the LNB for any visible damage and ensure it is securely attached to the dish.
-
Regular maintenance of your DStv system can prevent future signal problems and ensure consistent performance.
-
Regularly check for loose or damaged cables to prevent common DStv signal problems.
-
If your signal strength is below 50%, adjustments or repairs may be needed to fix DStv signal issues.
-
For better signal stability and protection against rain fade, use a 90cm dish.
-
For persistent signal issues, hire an accredited DStv installer who uses a professional field strength meter.
-
Professional DStv installation ensures optimal signal quality and long-term reliability.
-
90% of DStv signal issues stem from poor initial installation.
-
A professional installation guarantees an investment that saves you from costly service calls and equipment replacements.
-
Hiring experienced technicians is worth every penny as they have the specialized tools and expertise to diagnose and fix problems efficiently.
-
Professional installation can prevent future DStv signal problems by ensuring all components are correctly set up, including proper decoder setup.
-
A well-executed installation minimizes the risk of signal loss due to misalignment or poor connections.
-
Seek professional help and hire a DSTV technician for complex signal issues that cannot be resolved through basic troubleshooting.
-
Proper decoder setup is crucial for reliable signal reception, especially in multiroom or extra view setups.
-
Signal interference from weather conditions or obstructions can disrupt your DStv signal.
-
You may lose signal due to misalignment, faulty equipment, or environmental factors.
-
Regular maintenance is a preventive measure to keep your DStv system running smoothly.
No Signal or Poor Signal Strength?
-
Check cables for any loose cable connections and make sure all cables between your TV and decoder are securely plugged in.
-
Reboot your decoder to fix DStv signal issues caused by minor software glitches.
-
Ensure all cables are tightly connected.
-
Check for obstructions like trees or buildings blocking the dish.
-
Realign the dish slightly if necessary.
-
If you cannot fix DStv signal issues yourself, seek professional help.
For persistent signal problems, book a DStv repair service for professional assistance.
Final Thoughts
Setting up your DStv signal can be straightforward if you follow these steps carefully. However, if you need expert assistance, Sat Digital DSTV installer offers professional installation and troubleshooting services. For persistent signal issues, it’s best to seek professional help, and remember that regular maintenance—such as routine checks, cleaning, and cable inspections—will help prevent future problems and keep your system running smoothly. Knowing how to set up your DStv signal will ensure you enjoy uninterrupted viewing.
Need help? Contact us today!